Installation
El Mariachi is installed from within the Rhapsody player. Click here to download Rhapsody and view the library installation instructions.
Technical Specifications
43962 Samples @ 183MB 24Bit/48kHz
12 Instruments
3 Phase aligned dynamic layers (sustain articulations)
3 Mic positions
What’s Included
Mariachi musicians often play different instruments depending on the song, allowing the ensemble to adapt its sound and style to suit various pieces. El Mariachi focuses on capturing the specific techniques and articulations used by modern mariachi players, providing an authentic representation of the diverse sounds and expressions that characterize this musical tradition.
The adaptive articulation, included with the violins and trumpets, intelligently responds to the your playing style, automatically triggering legato, trills, short notes, long notes, accents, and crescendos as needed. This allows for expressive performances using just a keyboard and a few controllers, making it easy to achieve a natural, organic sound.
| 3x Solo Violins 1x Duet Violins | Important in both melody and harmony, weaving intricate melodic lines and providing expressive counterpoints that enhance the emotional depth and richness of the ensemble |
| 2x Solo Trumpets 1x Duet Trumpets | Delivers bold, melodic lines and harmonies, often taking the lead in creating powerful, dynamic statements while adding brightness and energy to the ensemble’s overall sound. |
| Guitarra | Complements the vihuela and guitarrón by offering harmonic support and often taking on melodic roles. |
| Vihuela | Provides bright, sharp rhythmic accompaniment, often reinforcing the harmony and adding a lively, percussive texture. |
| Guitarrón | Serves as the foundation of the rhythm section, providing deep, resonant bass lines that support the harmony and drive the energetic pulse of the ensemble. |
| Arpa Jalisciense | Provides intricate melodic lines and rhythmic accompaniment, often enhancing the harmony. |
| Acordeon | The piano accordion adds melodic and harmonic layers, often filling in the gaps between the string and brass sections. |
What is Mariachi?
Mariachi is a traditional Mexican music genre characterized by lively rhythms, rich harmonies, and vibrant instrumentation, typically featuring violins, trumpets, vihuela, guitar, and guitarrón.
Originating in the 18th century in the western regions of Mexico, particularly in Jalisco, mariachi has evolved from rural folk traditions into a popular and iconic cultural symbol of Mexico. Performers often wear elaborate “charro” outfits with wide-brimmed hats, enhancing the visual spectacle.
Mariachi music covers a range of emotions, from celebratory tunes like “sones” and “rancheras” to romantic ballads, and it is integral to celebrations, festivals, and cultural events.
El Mariachi focuses on capturing the specific techniques and articulations used by modern mariachi players, providing an authentic representation of the diverse sounds and expressions that characterize this musical tradition.
Common Mariachi Genres
| Son Jarocho | Son Jarocho is a vibrant, traditional music style from Veracruz, Mexico, blending Indigenous, African, and Spanish influences, characterized by lively rhythms, improvisation. |
| Son Jalisco | Son Jalisco, originating from the state of Jalisco, Mexico, is a traditional music style that heavily influenced mariachi, characterized by its energetic rhythms, vibrant melodies, and the prominent use of string instruments like the vihuela, guitarrón, and violins. |
| Ranchera | Ranchera is a traditional Mexican music genre rooted in rural folk traditions, characterized by emotive melodies and lyrics that often reflect themes of love, patriotism, and nature, typically performed by mariachi ensembles with a strong vocal presence and accompanied by guitars, trumpets, and violins. |
| Polka | Polka is a lively, upbeat dance music genre originating in Central Europe, characterized by its fast 2/4 time signature and distinctive rhythmic pattern, often performed by ensembles featuring accordions, brass, and woodwind instruments, and widely adapted into Mexican regional music styles such as norteño and mariachi. |
| Pasodoble | A lively, march-like music style adapted from the traditional Spanish pasodoble, featuring a strong, rhythmic 2/4 beat and energetic melodies played by trumpets, violins, and guitars. It often highlights the dramatic, processional flair of bullfighting, blending the Spanish influence with the distinct sound and instrumentation of mariachi. |
| Joropo | Mariachi joropo is an adaptation of the traditional Venezuelan joropo, featuring the energetic, syncopated rhythms of the original style but played with mariachi instrumentation like trumpets, violins, vihuela, and guitarrón. It blends the lively 3/4 or 6/8 joropo rhythm with the bold, resonant sound of mariachi, creating a dynamic and spirited fusion often used for fast-paced, celebratory performances. |
| Jarabe | A traditional Mexican musical form known for its lively, danceable rhythms and festive spirit, often performed as a suite of varied regional tunes. It features alternating tempos and playful melodies. The most famous example is the Jarabe Tapatío (Mexican Hat Dance), symbolizing national pride and often performed with vibrant, folkloric dance. |
| Huapango | A traditional Mexican music style originating from the Huasteca region, characterized by its lively, syncopated rhythms, often in 6/8 time, and distinctive melodies. The genre’s energetic rhythm and vibrant, improvisational style make it a staple in festive and celebratory mariachi performances. |
| Bolero | A slow, emotional genre within mariachi music, characterized by its romantic, heartfelt lyrics and smooth, flowing melodies. It typically features expressive vocals, accompanied by the rich harmonies. Mariachi boleros are often performed at serenades or romantic gatherings, showcasing the emotional depth and versatility of the mariachi ensemble. |
The User Interface

The interface is divided into sections; the header bar at the top, the body in the middle, and the status bar and the footer at the bottom. There are also some additional windows for the Settings panel and Preset Browser.
Header

Instrument Name
The name of the currently loaded Rhapsody instrument is displayed at the top left of the header.
Return to Instrument List
Unloads the current instrument and takes you back to the Rhapsody home screen.
Settings Button
Opens the Settings panel.
Current Preset
Here you can see the preset category followed by the preset name. Clicking on this will open the Preset Browser.
Load Previous or Next Preset
These two buttons to the right of the current preset display allow you to load the previous or next preset.
Save Preset
Clicking this will allow you to overwrite the current preset, if there is one loaded, or create a new preset.
The Body

There are several knobs and sliders on the interface. For example the main volume slider above the keyboard, and the AHDSR knobs below the envelope display.
You can control these by clicking on them and moving your mouse up and down or side to side, depending on the orientation of the control. Doing so will change the control’s value, which will be displayed at the same time.
Almost all of the knobs and sliders can be controlled with a MIDI continuous controller, either a hardware controller or MIDI data sent from your DAW or plugin host.
Many of the controls already have specific CC numbers assigned to them by default. Change or adding a MIDI CC assignment is as easy as right-clicking (or CTRL+clicking) on the control and either selecting a CC from the “Assign MIDI CC” popup, or click the MIDI learn option and moving a hardware controller. You can also remove MIDI CC assignments from this same popup
Velocity Response

For the short articulations velocity is used to trigger different dynamics. A higher velocity corresponds to a higher dynamic.
For the Adaptive articulation it serves multiple purposes under-the-hood but primarily you’ll notice it controls the attack of a note. Playing a lower velocity produces a longer, smoother, attack. While a higher velocity can create a shorter attack.
The velocity response table allows you to scale the MIDI velocity values coming into the instrument. The X axis represents the input velocity and the Y represents the output velocity.
The vertical line shows the currently played input velocity.
– Nodes can be added to the table by left-clicking.
– Nodes can be dragged around by holding left-click on a node and moving the mouse.
– You can delete a node you’ve added either by right-clicking on it or by holding ctrl/cmd and left-clicking on it.
– There are two methods to adjust the curve between two nodes. Start by placing your mouse cursor between the nodes. Then either hold right-click and move the mouse up and down, or roll your mouse’s scroll-wheel up or down.
Articulations

Each of the 12 instruments includes a selection of articulations. You can change articulation in real time by triggering the keyswitch listed next to the articulation’s name.
In addition to the keyswitched articulations, the acordeon, guitarra, and vihuela feature some special playing techniques that are discussed in their own section later in this document.
Acordeon
| Name | Description |
|---|---|
| Clarinet Reed 6xRR | A smooth, rounded tone similar to a clarinet instrument, often used for its softer and mellow sound quality. |
| Musette Reed 6xRR | Tuned slightly sharp or flat relative to the main reed, creating a distinct, bright, and wavering sound ideal for the lively, “wet-tuned” effect common in French and folk music |
Arpa Jalisciense
| Name | Description |
|---|---|
| Fingertip 6xRR | A warm, full-bodied tone, allowing for greater control and dynamics in softer, lyrical passages |
| Fingernail 6xRR | A brighter, crisper sound, offering a more percussive and articulate attack, ideal for accents and sharper effects in the music. |
Guitarra
| Name | Description |
|---|---|
| Sustain 2xRR | Mariachi guitar often uses sustained notes to provide a resonant, rhythmic foundation, filling the harmonic space between the crisp strums of the vihuela and the deep bass of the guitarrón. |
| Sustain + Release 2xRR | Sustained notes with a release sample triggered on MIDI note off. |
| Muted | Can add a percussive, rhythmic texture, emphasizing syncopation and creating dynamic contrast, especially in faster, upbeat pieces like sones and rancheras. |
| Tremolo 2xRR | Creates a shimmering, sustained effect that enhances the emotional intensity and dramatic flair of the music, especially during expressive or climactic moments. |
| Muted Tremolo | Combines a rapid strumming motion with palm muting, producing a percussive fluttering sound. |
Vihuela
| Name | Description |
|---|---|
| Sustain 2xRR | On the vihuela, individual sustain notes are used sparingly to add a brief moment of resonance and melodic emphasis, often in contrast to the instrument’s typical sharp, rhythmic strums, helping to accentuate key phrases or transitions. |
| Sustain + Release 2xRR | Sustained notes with a release sample triggered on MIDI note off. |
| Muted 2xRR | A softer, more controlled resonance that adds a delicate rhythmic pulse or a subtle harmonic texture without dominating the overall sound |
| Tremolo 2xRR | A shimmering, rhythmic drive that enhances the lively, vibrant energy typical of mariachi music, especially in fast-paced pieces like sones. |
| Muted Tremolo 2xRR | A soft, rhythmic buzz that adds a hushed percussive effect, subtly enriching the ensemble’s rhythm without overwhelming the melody. |
| Harmonics 3xRR | A bright, ethereal quality to the music, often used for ornamental effects or to highlight particular moments in a piece. |
| Left Hand Picking 2xRR | A technique where the left hand, typically responsible for fretting the notes, also plays a role in the picking or strumming motion, allowing for unique variations in tone and rhythm, although it is less common compared to traditional right-handed picking |
| Body hits/taps 4xRR | Percussive sounds, adding a rhythmic texture and enhancing the overall groove, especially in fast-paced mariachi music. Often used to emphasize the beat or accentuate transitions between sections of a song. |
| Strike Mutes 7xRR | Add variety and dynamic control to the performance, enhancing the overall rhythm and texture of the music. |
Guitarrón
| Name | Description |
|---|---|
| Sustain 3xRR | Used during melodic lines or solo passages, where a more focused, clear tone is needed to stand out or highlight specific harmonic changes in the music. |
| Octave 3xRR | The guitarrón generally plays notes in octaves to create a fuller, more resonant sound that reinforces the bass and harmonic foundation of the mariachi ensemble. |
| Harmonics 2xRR | High-pitched, bell-like sounds that add brightness and texture, often used for special effects or to accentuate key moments in a piece. |
Trompetas
| Name | Description |
|---|---|
| Adaptive | Tailors the attack based on the note velocity, producing a softer attack at lower velocities and a sharper, punchier sound at higher velocities. It also responds to performance nuances, triggering legato transitions when needed, and allows for shorter notes by lifting the key sooner. Additionally, it features release trigger samples, adding further realism by accurately simulating the sound of the note’s decay. |
| Sustain 3xRR | Sustain samples at three phase-aligned dynamics, providing consistent, high-quality sustained notes across varying dynamic levels. |
| Staccato 9xRR | Short, crisp notes with a sharp attack and quick release, capturing the characteristic detached style commonly used in mariachi music for rhythmic emphasis and clarity. |
| Staccatissimo 9xRR | Very short, detached notes with an even sharper, more pronounced attack than staccato, offering a crisp, percussive effect ideal for fast, energetic passages. |
| Doit (Trompeta 1/2 only) | A quick, pronounced upward pitch bend followed by a sharp, abrupt release, emulating the dramatic, expressive effect often used in mariachi music to add flair and emphasis to a note or phrase. |
Violines
| Name | Description |
|---|---|
| Adaptive | Tailors the attack based on the note velocity, producing a softer attack at lower velocities and a sharper, punchier sound at higher velocities. It also responds to performance nuances, triggering legato transitions when needed, and allows for shorter notes by lifting the key sooner. Additionally, it features release trigger samples, adding further realism by accurately simulating the sound of the note’s decay. |
| Sustain 3xRR | High-quality sustained notes across varying dynamic levels. Includes release trigger samples that activates once the note is released. |
| Rebow | Recorded with the violinist rebowing the note. The samples have then been looped at the rebow points, enabling an indefinite note hold, simulating continuous bowing. Includes release trigger samples that activates once the note is released. |
| Tremolo | Rapid, repeated bow strokes, creating a shimmering, sustained effect that enhances the emotional intensity and adds dramatic flair. Often used in slower, expressive sections or during climactic moments to heighten the tension. |
| Staccato 9xRR | Short, sharp bow strokes that produce crisp, detached notes, often used for rhythmic drive, accentuation, and clarity in faster, lively sections of the music. |
| Staccatissimo 9xRR | Very short, sharply articulated notes with a more pronounced separation than staccato, creating a highly energetic, percussive effect often used in fast, rhythmic passages to add intensity and emphasis. |
| Pizzicato 9xRR | A bright, percussive sound often used for rhythmic accents or light, playful passages to add variety and texture to the ensemble. |
| Ricochet 2xRR | A bouncing bow technique, where the bow is allowed to “bounce” on the strings, creating rapid, light, and spiccato-like notes that add a playful, energetic texture, often used for lively, fast-paced sections. |
Envelope

The gain envelope allows you to control the Attack Curve, Attack Time, Decay Time, Hold Time, Sustain Level, and Release Time of the sound of instrument.
For a faster, punchier attack, just shorten the release time, or you can increase it for a more ambient sounds with less transient.
Each articulation has a different envelope profile which will be saved in your custom presets.
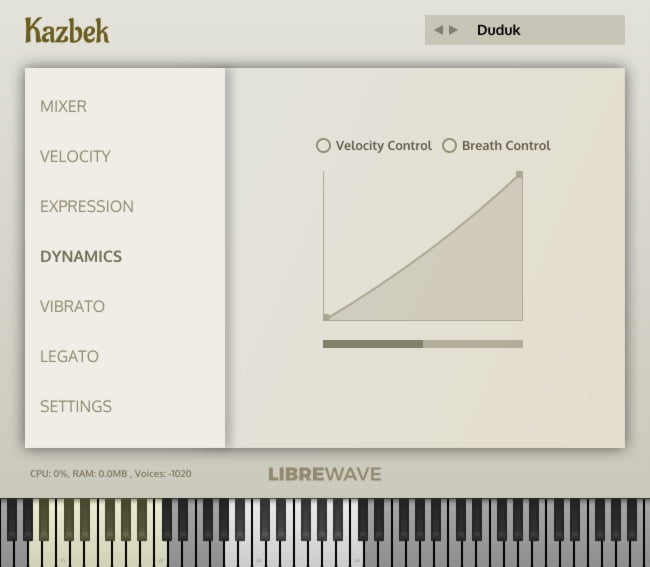
Dynamics

The expression knob is a sub-volume control, applied before the master volume. This control provides an overall volume change to the instrument. This can be used in conjunction with the dynamics controller to customise the dynamic range of the instrument and create niente effects.
Each note of the long articulations were recorded at multiple dynamics levels. The samples were then phase aligned to eliminate any chorusing or phasing artifacts when the samples are crossfaded.
The dynamics knob allows you to smoothly crossfade between the different layers. A volume change is also applied automatically to keep the dynamics consistent and realistic across the range of the instruments.
Vibrato

The speed knob controls the speed of the vibrato. A lower value will produce a slower vibrato while a higher value creates a faster vibrato.
The amount knob controls the intensity of vibrato.
Random variations are added to the vibrato in real time to give it a more natural and human feel. These variations adapt to the intensity and rate you are using.
For the trompetas the vibrato is biased to an upward pitch in keeping with the typical style of the mariachi.
Growl & Flutter

The trompeta instruments feature a growl knob and a flutter knob. These allow you to simulate the growling effect (a deep, raspy tone created by vocalizing into the instrument) and the flutter tonguing effect (a rapid, vibrating sound produced by rolling the tongue while playing). These knobs adjust the sustain samples to introduce these expressive effects, adding a layer of dynamic character to the performance.
The Status Bar

Resource Usage
This shows the CPU and RAM usage of the instrument. You can also see the number of voices currently playing.
Tip: If you are sending MIDI into the instrument but the voice count and RAM usage remain at 0 and you hear no sound. It’s likely that the instrument is unable to locate the samples. Return to the Rhapsody home screen and relocate the samples for the instrument.
Master Volume Slider
This slider controls the volume. By default it is mapped to CC #7.
Master Pan Slider
This slider controls the left/right balance. By default it is mapped to CC #10.
The Keyboard

Playable Keys
The highlighted white keys on the keyboard show the playable range for the current articulation.
Key Switches
The red key switches can be used to change the active articulation. The position of these keys will vary depending on the instrument.
The acordeon, guitarra, and vihuela all include additional keyswitches which are discussed in their own section later in this document.
MIDI Panic
The MIDI panic button is there in case something goes wrong and a note get stuck and won’t turn off. Hit this button and it will kill all currently sounding notes.
Preset Browser

The preset browser is accessed by clicking the name of the currently loaded preset in the header.
The browser itself is divided into three columns allowing you to select a preset based on its bank and category. From here you can add, rename, or delete your own presets – factory presets cannot be changed.
Show Favourites
Clicking the star button next to a preset will toggle its availability in your favourites list. You can see all your favourites by clicking the Favourites button.
Search by Name
You can filter the list of presets by typing in the search bar and hitting enter.
Save Current Preset
You can save any changes you’ve made to the currently loaded preset by clicking the Save Preset button.
Add New
The plus button below a column allows you to add a new item to that column. Banks and Categories are stored as folders on your computer while presets are stores as human readable files with a .preset extension.
Rename
Clicking the pencil button will popup a dialog box where you can enter a new name for the selected item.
Delete
The button with the trash can icon lets you delete an item.
Instrument Specifics
Acordeon

The piano accordion used in mariachi music has a piano-style keyboard on one side, for melody, and a set of buttons on the other, used for playing chords and bass notes.
These buttons are arranged in rows and are used to control the left-hand side of the instrument, where they activate a set of reeds to produce deep, resonant bass sounds or simple harmonic accompaniments.
The instrument’s bellows allow the player to vary the volume and dynamics, while the combination of the piano keyboard and the bass buttons enables the accordion to play both melody and harmony, making it a versatile addition to the mariachi ensemble.
For El Mariachi, we recorded individual bass notes and chord keys, mapping the samples to the keyboard in a way that’s intuitive for keyboard players.
The blue keys at the lower end of the keyboard, starting at C0, are designated for bass notes, while the green keys starting at C1 are used to trigger chords.
When you play an individual chord key, no sound will be produced. However, playing a Major, Minor, or 7th chord (minimum of 3 notes) will trigger the corresponding sample. These chords are not a composite of individual notes or accordion keyboard samples; instead, each is created from a single button on the left-hand side of the accordion. The limitation to three chord types reflects the available options on the real instrument.
Additionally, the accordion features four yellow keys, starting at F5, which trigger recordings of the bellows inflating and deflating. These can be used to enhance the realism of the virtual performance.
Guitarra & Vihuela

In addition to the regular keyswitched articulations available in the playable range of the guitarra and vihuela are some additional controls, including a sophisticated picking and strumming engine.
The vihuela also features some strike mutes (up/down/side) which can be triggered using the peach coloured keys F1 – Bb1 and body hits/taps available with the keys C2 – F2.
The Guitar Paradigm
As with most stringed instruments, a guitar can play many of the same notes on different strings.
When creating a virtual guitar, there are two main approaches: one option is to sample each note individually and map them to the keyboard, a method commonly used for other sample libraries of stringed instruments.
Alternatively, we can sample every fret of each string and implement advanced scripting and a user-friendly GUI to give users access to all possible variations. This is the method we chose for El Mariachi.
A guitar can only play one note per string at any given time. To maintain realism in the virtual instrument, we should follow this rule, though it might not always be ideal when using a MIDI keyboard to perform.
To balance flexibility and authenticity, El Mariachi provides an option to switch between polyphonic and monophonic string modes.
Legato
This one-note-per-string limitation also affects how legato transitions are handled. For a guitarist to play a smooth transition on a single string, both notes must be within a reachable hand span. El Mariachi allows you to set the legato range or disable legato entirely if preferred.
Additionally, you can slide between notes by triggering a legato transition while activating your sustain pedal (CC#64).
The legato mechanism is handled on a per-string basis, this makes it possible to perform a legato transition on each string at the same.

Hand Position
To navigate the multiple fret recordings along the fingerboard, El Mariachi includes a hand position slider, represented by a small triangle on the left of the fingerboard.
You can move this slider up or down to set the virtual hand position. The guitar engine will try to play notes that are within a realistic hand span from the selected position, plus open strings if that option is enabled.
Chords
To strum a chord, simply play a triad or extended chord within the playable range of the keyboard, then use one of the four yellow strumming keys: C1 triggers a down strum, C#1 triggers a muted down strum, D1 triggers an up strum, and D#1 triggers a muted up strum.
You’ll hear the chord you played strummed across the strings with an accurate guitar chord voicing, which is also visually indicated on the on-screen fingerboard.
You can “pick” individual strings using the purple keys starting at F0, which will trigger the appropriate notes for the chord you are currently playing.
Press B0 to clear the current chord and return the instrument to open tuning.
When playing a chord in the playable range, the individual notes will sound as you play them, which may not always be desirable. To temporarily mute the playable range while selecting a chord, hold down the green keyswitch at C0.
Engine Settings
The default settings offer a solid configuration for the instrument in most situations. However, there are many additional options available for customizing the picking and strumming engine. You can access these options by clicking the ^ icon below the fingerboard.
| Strum Speed | Sets the maximum duration of the strum |
| Velocity Speed | This setting controls how much the note-on velocity influences the strum speed. At 0%, velocity has no impact on the strum speed. At 100%, velocity greatly affects strum speed, with lower velocities resulting in slower strums. |
| First String Down | The first string (from the left of the Fingerboard) used when strumming down. |
| First String Up | The first string (from the right of the Fingerboard) used when strumming up. |
| Length Down | Sets the maximum number of strings played in a down strum. |
| Length Up | Sets the maximum number of strings played in an up strum. |
| Velocity Length | This setting determines how much note-on velocity influences the number of strings strummed. At 0%, velocity has no effect. At 100%, velocity significantly impacts the strum length, with lower velocities resulting in fewer strings being triggered |
| Pick Direction | This setting controls the direction of individual picked notes: Silent: No notes will sound in the playable range, but chords can still be strummed, ideal for rhythm-only situations. Down: All notes are played with down picks. Up: All notes are played with up picks. Alternate: Playback alternates automatically between down and up picks. Fingerpick: Notes on lower strings are played with down picks, while higher strings are played with up picks. |
| Legato Range | This setting controls the maximum fret distance allowed for legato transitions. A value of 0 disables the per-string legato system, while a value of 3 is typically a good choice for smooth transitions without overextending the hand position. |
| Tremolo Speed | Controls the speed of the Tremolo and Muted Tremolo articulations. |
| Prefer Open Strings | If enabled, when playing at a higher hand position open strings will be used when possible |
| Legato Retrigger | This setting works in conjunction with the legato range. When enabled, releasing a legato note while still holding down the first note of the phrase will cause the first note to retrigger. |
| Show Comfort Range | This feature displays an overlay on the fingerboard, indicating a comfortable playing range for a musician based on the current hand position. It is purely visual and does not affect the sound or the notes you can play. |
| Polyphonic | When enabled, you can play more than one note on the same string. However, playing within the legato range will override this setting. |
Trompetas & Violines: Adaptive Articulation
Using a Breath Controller
A breath controller assigned to the Dynamics knob can greatly help enhance the realism of your performance.
Long Notes
Holding down a key will sustain a note indefinitely. Every sample will loop so you can maintain a note of any length. For a realistic performance you should try and keep in mind how much air/bow the player would be using to hold the note and stop when appropriate.
You can use the continuous controller assigned to dynamics to create swells, crescendos, diminuendos, or any other dynamic expressions. A breath controller, mod-wheel, or expression pedal is perfect for this.
Short Notes
To play a short note just release the key earlier and the note will be shorter. Play the note at a higher velocity with a brief swell on the dynamics controller to create a punchy staccato note. Using more or less force, releasing the key earlier or later, and varying the dynamics can create a variety of short articulations.
Attack and Accents
Playing softly, with a velocity below the current dynamic, will trigger a slower attack. A velocity at around the same level as the current dynamic will trigger a normal attack. A note with a velocity higher than the current dynamic will produce an accented attack.
Legato
Playing in an overlapped style, holding one note while playing the next, will trigger a legato transition between the notes. You don’t need to worry about pacing your playing to get a smooth transition or to compensate for lag. The instrument will detect your playing speed, the pressure you’re using on the keys, and a few other parameters to calculate each transition.
Glides
Glissandi, slides, and portamento can be triggered by pressing one key while another is already held and your sustain pedal (or other controller assigned to CC64) is engaged. The rate of the glide is controlled by velocity, a higher velocity produces a faster glide.
Trills
Trills of almost any interval, duration, or tempo can be played in a very natural fashion using the built-in retrigger feature. Hold down the first note of the trill while pressing and releasing the second. This is especially realistic when the library is used in combination with a breath controller linked to dynamics.
Chords
It is sometimes useful to be able to play two or more notes at once. The library has a built-in chord detector that will attempt to differentiate between a legato transition and playing a chord.
There is no guarantee that it will be accurate 100% of the time. If you try to play a chord but only one note sounds it means the system thought you were trying to play a legato transition. This feature should be used sparingly and is included as a tool for sketching rather than for crafting a realistic performance.
Additional Content
El Mariachi includes extra content to help you create outstanding music and deepen your understanding of mariachi instruments.
MIDI Strumming Patterns
This collection includes 100 MIDI files organized by mariachi genre, covering the most common time signatures in these styles. However, feel free to mix and match them in any context you find suitable, as they are not limited to just mariachi genres.
The MIDI files can be easily dropped into your DAW, allowing you to sequence them in any way you like. Since they are MIDI, you can adjust the timing and tempo of the patterns and individual notes to tailor them to your specific needs.
Each pattern includes a few chords for immediate playback, but you are encouraged to replace these with your own. Additionally, MP3 files demonstrating each pattern are included for quick auditioning.
While these patterns were created using the guitarra, they can also be used effectively with the vihuela, where you can further enhance them by incorporating body hits, taps, and strike mutes unique to that instrument.
The patterns were created with Velocity Speed set to 75% and Velocity Length set to 50%, with all other settings left at their default values.
In some of the patterns, I have omitted bass notes to be played by the guitarrón. This is a common practice in mariachi, and you may want to remove the bass notes from most patterns if the guitarrón is providing the support.
| Son Jarocho | 10x 6/8 |
| Son Jalisco | 10x 6/8 |
| Ranchera | 11x 2/4 5x 3/4 5 x 4/4 |
| Polka | 10x 2/4 |
| Pasodoble | 10x 2/4 |
| Joropo | 11x 6/8 |
| Jarabe | 5x 2/4 5x 6/8 |
| Huapango | 10x 3/4 |
| Bolero | 10x 4/4 |
| Turnarounds | Turnarounds are brief melodic phrases that you can add at the end of strumming patterns to make them more dynamic and interesting. 5x 4/4 5x 6/8 |
Mini Masterclass Videos
The musicians of Mariachi De Oaxaca have graciously recorded a set of masterclass videos, in which they discuss their instruments, explore their roles in various mariachi genres, and explain how they work together as a group.
These videos provide valuable insights into the nuances of mariachi music, helping you better understand the individual instruments and their interplay within the ensemble.
By watching, you’ll gain a deeper appreciation of the mariachi tradition and improve your own compositions and arrangements by learning how each instrument contributes to the overall sound.
Impulse Responses
If you’ve taken advantage of the pre-order bundle you’ll have received a collection of impulse responses, recorded at Studio Uno. For all of the recordings the microphones remained in the same place and only the sound source (mono speaker) was repositioned.
The impulse file names are split into two segments, separated by “-“.
Segment 1: Tells us the position of the sound source.
- pos1/pos2: Is the position of the sound source from the West wall of the room. With 1 being closer to the wall.
- left/right/centre: When facing the sound source – its position to the left, right, or centre of the room.
Segment 2: Tells us the microphone configuration.
- close: Close omni microphone (mono).
- direct: Close directional microphone (mono).
- midside_stereo: Middle distance, and mid/side configuration.
- midside_left: Just the left channel of the mid/side. *
- midside_right: Just the right channel of the mid/side. *
- midside_centre: Just the centre channel of the mid/side. *
- room_stereo: Most distant mics from the sound source.
- room_left: Just the left channel of the room mic. *
- room_right: Just the right channel of the room mic. *
- Provided as the original impulses without post processing, trimming, or normalization, etc.
* Due to the sound source and microphones being placed facing each other, the positional left/right names are the inverse of the microphone channel names. For example “pos1_left-room_stereo” will have a stronger signal in the right channel.
Acknowledgements
Musicians: Mariachi de la ciudad de Oaxaca
Recording & Logistics: Studio Uno
Editing and Scripting: David Healey
Demos: Duncan Formosa, Ihab Mansour, Justin Bell, HarmonyCore Jr, Artem Akmulin, Nigel Andreola