
Kazbek includes two traditional Georgian/Armenian instruments recorded on location by local musicians.
The duduk is a double reed instrument with a sound similar to an English Horn. It’s usually played in pairs with one player performing the melody while another plays a drone.
There are two types of salamuri, reeded and non-reeded, Kazbek contains the latter. It’s a fipple flute style instrument, similar to a recorder. According to wikipedia legend salamuri tunes cheer people up, tame animals, make birds sing, and relieve human sorrow.
Installation
All Libre Wave virtual instruments and effects follow the same installation procedure. Please see the detailed installation guide for instructions on how to setup this product on your system.
Interface
Quick Start
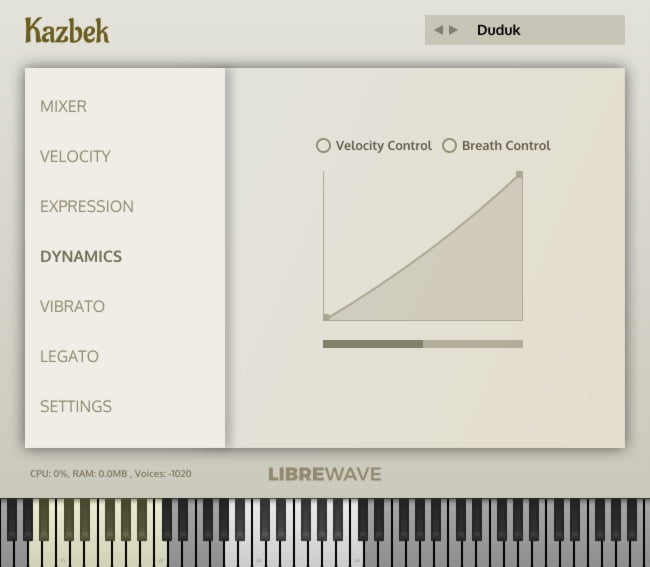
- The menu at the left can be used to move between the various control sections – Mixer, Velocity, Expression, etc.
- When you move a knob or slider with your mouse its value will be displayed.
- Hold down ctrl or cmd to increase precision when you move a knob or slider.
- You can double click a knob or slider to reset it to its default value.
- If you hold the shift key while clicking on a knob or slider an input box will be displayed where you can enter a specific value.
Automation
To use MIDI learn to link a continuous controller (CC) to a knob or slider:
- Right click the control.
- Select MIDI learn.
- Move a hardware knob, wheel, or fader to assign it to the control.
Many of the knobs have default CC assignments. You can view all CC assignments in the MIDI Automation tab of the Settings window. This is explained in more detail later in this guide.
You can remove CC assignments, including those assigned by default, by right-clicking the control and selecting Remove CC.
Many of the on-screen controls will respond to automation within your DAW without needing to assign a CC to them first. Check your DAW’s user guide for details on how to access automatable parameters.
Keyboard Layout

- The illuminated black and white keys show the playable range of the currently loaded instrument.
- The coloured keys trigger ornaments and phrases.
- Salamuri: Yellow keys trigger rips (up and down).
- Salamuri: Green keys trigger bends.
- Salamuri: Red keys trigger runs.
- Duduk: Yellow keys trigger trills.
Dynamic Controls
Velocity
Note on velocity (how hard you hit a key) controls the attack of each note. Playing a low velocity will create a longer attack and a high velocity will produce a shorter attack.
Velocity can also be used to control the initial Dynamic of a note. You can enable this using the button in the Dynamics section of the interface.
Vibrato

The vibrato intensity and rate can be controlled using either the two independent sliders or the XY pad. The XY pad is a great option when using a touch screen and provides continuous control over both parameters at the same time.
The vibrato intensity control (beneath the XY pad) sets the amount of vibrato that will be applied.
The vibrato rate control (to the right of the XY pad) sets the speed of the vibrato. The higher the value the faster the vibrato will be.
Expression
The expression control provides an overall volume change to the instrument. This can be used in conjunction with the dynamics controller to customise the dynamic range of the instrument and create niente effects.
Dynamics
Each instrument was recorded at three dynamic levels. The dynamics control allows you to smoothly crossfade between these recordings. A volume change is also applied automatically to keep the dynamics consistent and realistic across the range of the instrument.
Pitch Bend
You can use your MIDI keyboard’s pitch bender wheel to bend the pitch of a single note up or down by up to one semi-tone.
Sensitivity Curves

Many parameters have editable sensitivity curves. These enable you to adjust how the instrument responds to you when you perform with a MIDI controller.
- Move a node by clicking on it and dragging.
- Add a new node by clicking anywhere along the curve that doesn’t already have a node.
- Delete a node by right clicking it.
- Edit the curve between two nodes by hovering your mouse cursor over a node and moving the scroll wheel up or down.
Performance Techniques
The library is designed to be performed in real time and contains a few features to make obtaining a realistic performance easier and more natural for a keyboard player.
Using a Breath Controller
The breath controller mode can be enabled in the interface’s dynamics section. In this mode no sound will be triggered until the Dynamics controller is at a value greater than 10. If the value drops below 10 any notes that are playing will be stopped. You should assign your breath controller to control Dynamics.
Note duration
Holding down a key will sustain a note. For a realistic performance you should try and keep in mind how much air the player would be using to hold the note and stop when appropriate.
You can use the continuous controller assigned to dynamics to create swells, crescendos, diminuendos, or any other dynamic expressions. A breath controller, mod-wheel, or expression pedal is perfect for this.
To play a short note just release the key earlier and the note will be shorter. Play the note at a higher velocity with a brief swell on the dynamics controller to create a punchy staccato note. Using more or less force, releasing the key earlier or later, and varying the dynamics can create a variety of short articulations.
Attack and Accents
Playing very softly, with a velocity below 20, will trigger a slower attack, a velocity above 20 but below 70 will trigger a normal attack. When playing at velocities of 70 or above an attack overlay sample will be triggered first and blended smoothly into the start of the sustain sample.
Legato
Playing in an overlapped style, holding one note while playing the next, will trigger a legato transition between the notes. You don’t need to worry about pacing your playing to get a smooth transition or to compensate for lag. The instrument will detect your playing speed, the pressure you’re using on the keys, and a few other parameters to calculate each transition.
Retrigger
A sustain pedal (or other controller assigned to CC64) can be used to retrigger a note. Whle the sustain pedal is held down any key that is released will be retriggered. Releasing the sustain pedal will stop the note.
If you want to retrigger a note immediately after a glide you need to release the sustain pedal at the end of the glide and then hold it down again before releasing the key for the retrigger.
Trills
Trills of any interval, duration, or tempo can be played in a very natural fashion using the built-in retrigger feature. Hold down the first note of the trill while pressing and releasing the second. This is especially realistic when the library is used in combination with a breath controller linked to dynamics.
Glides
Glissandi, slides, and portamento can be triggered by pressing one key while another is already held and your sustain pedal (or other controller assigned to CC64) is engaged. Playing with a lower velocity will trigger a slower glide while a higher velocity will create a faster one.
Chords
Although the instruments in this library are monophonic it is sometimes useful to be able to play two or more notes at once. The library has a built in chord detector that will attempt to differentiate between a legato transition and playing a chord. There is no guarantee that it will be accurate 100% of the time. If you try to play a chord but only one note sounds it means the system thought you were trying to play a legato transition. This feature should be used sparingly and is included as a tool for composing rather than for crafting a realistic performance.
Preset Browser

The plugin includes a selection of default presets which you can customize and you can also create your own.
The name of the currently loaded preset is always displayed at the top of the interface. Clicking on it will open or close the preset browser. The arrow buttons next to the name can be clicked to load either the previous or the next preset.
The browser is divided into separate columns which are used to organize the presets into categories or banks. The presets themselves are displayed in the right most column.
Filtering
You can filter the list of presets by typing in the search bar at the top of the preset browser and hitting enter.
Clicking the star icon next to a preset will add it to your favourites list, clicking it again will remove it from your favourites. You can see all your favourites by clicking the larger star icon next to the search box.
Adding and Editing Presets
Click the Add button beneath the appropriate column to add new categories, banks, or presets. You can use the Delete and Rename buttons to edit existing entries.
You can save any changes you’ve made to an existing preset by clicking the Save Preset button next to the search bar.
Adding or saving a preset stores the state of the controls on the interface as well as the currently loaded samples.
Import and Export
Clicking the More button will open a drop down menu offering you a number of options for importing and exporting your presets.
Settings

The settings screen gives you control over the sampler engine, hardware configuration, and MIDI options. The settings that are available will vary slightly depending on if you are using the standalone instrument or the plugin.
Engine Tab:
- Standalone application only
- Driver: This is used to set the audio playback system that the instrument will use. The choice of drivers will vary depending on your operating system.
- Audio Device: You can select which hardware audio output device (soundcard/audio interface) you want the instrument to use.
- Output: If your chosen device has multiple outputs you can use this menu to select which will be used by the instrument.
- Buffer Size: This is the buffer used by your chosen audio device. Lowering the buffer size reduces latency but if it’s too low it can cause pops and clicks to be heard.
- Sample Rate: This is the sample rate of your chosen audio device. The available options will vary based on your hardware.
- Standalone application and plugin
- UI Zoom Factor: You can increase or decrease the size of the instrument’s interface using the options in this menu. All of the instrument’s graphics and text are designed to scale perfectly without blurring or fuzziness.
- Streaming Mode: Select the option that suits the type of drive you are using to store the instrument’s samples.
- Max Voices: The amount of polyphony the instrument can handle. If the value is too low you may notice some dropouts when playing a lot of notes.
- Clear MIDI CC: Use this button to reset all MIDI continuous controller assignments you have made using the MIDI learn feature.
- Change sample folder location: If you move the samples to a new location you can use this button to point the instrument to them.
MIDI input tab: Displays the hardware MIDI devices that the instrument can see. You can check the boxes alongside the device names to enable those devices for MIDI input. This tab is only visible in the standalone application
MIDI channel tab: From here you can select the incoming MIDI channels that the instrument will respond to.
MIDI automation tab: Displays information about any MIDI continuous controller numbers you have assigned using the MIDI learn feature. It also allows you to adjust the range of values that the continuous controllers will use and provides you with a quick way to invert the values if desired.
About tab: Shows information about the plugin. If you ever require assistance with the plugin it’s a good idea to provide its version number which you’ll be able to find in this tab.
Acknowledgements
Recording Coordinator: Olajide Paris
Editing: Olajide Paris & David Healey
Scripting & Graphics: David Healey
IDE: HISE
