Introduction
Welcome to the user guide for Nuno Silva’s Hammered Dulcimer. A deeply sampled and highly playable hammered dulcimer library for Rhapsody.
All of the samples in this instrument were performed and recorded by Nuno Silva who we have collaborated with on several other instruments.
The instrument includes 16 articulations, including contemporary techniques and effects such as harmonics, ebow drones, and jim bows.
The Instrument
The hammered dulcimer is a stringed instrument played by striking its strings with small handheld hammers.
The strings are stretched over a wooden soundboard, which gives the instrument its characteristic resonant tone.
Hammered dulcimers are found in musical traditions across Europe, the Middle East and Asia, with variations in tuning, construction and playing technique.
Technical Specifications
| Player | Rhapsody 3.2.3+ |
| Samples | 24GB | 10824 @ 24-bit/48Hz |
| Size (Installed) | 11GB @ 24-bit | 6GB @ 16-bit |
| Articulations | 16 |
Installing Rhapsody
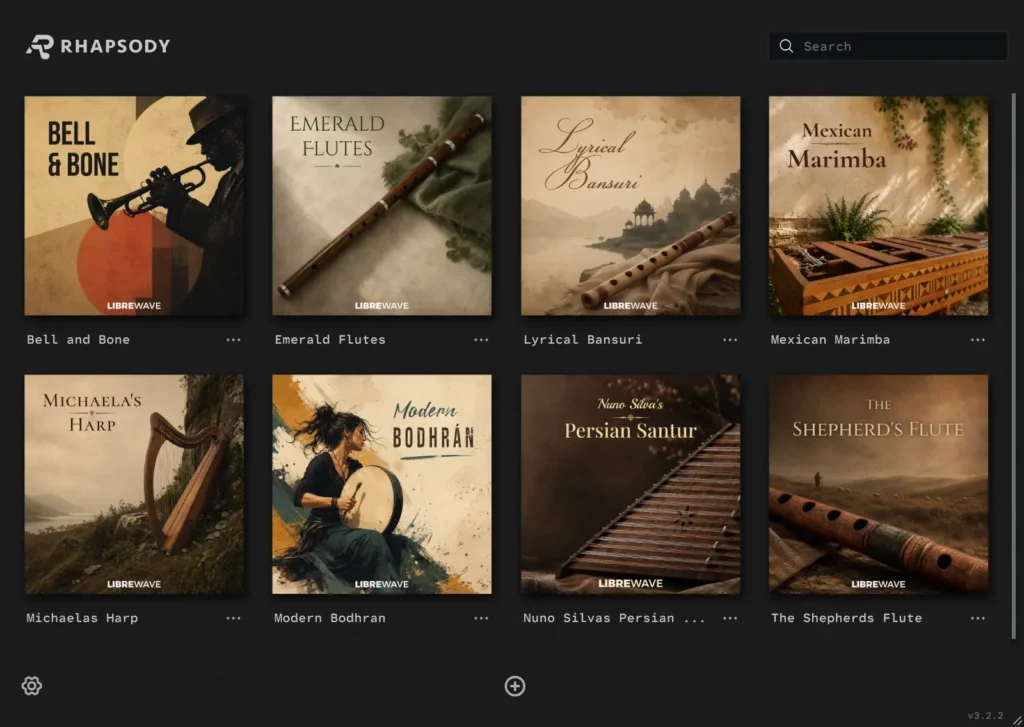
Rhapsody is Libre Wave’s free and open source player. It’s available for Windows, macOS, and Linux. It works completely offline, imposes no DRM, and does not track you.
Rhapsody is available as a standalone application, and a plugin in VST3, AU, and AAX formats, depending on your operating system.
Download and run the Rhapsody installer for your operating system.
Once Rhapsody is installed, come back to this guide to continue.
Downloading Packages
The installation package files are available for download through your account.
If this is the first time you’ve downloaded a Libre Wave product then you will need to create an account using the same email address used when you made your purchase.
Click here to create an account or sign in to your existing account.
Once logged in you can click here or click the user account icon in the top-right corner of the Libre Wave website to view your account details.
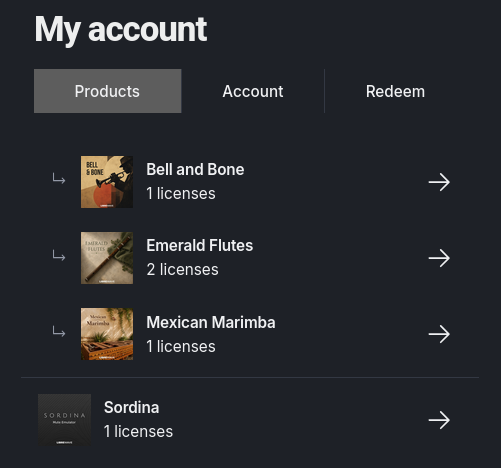
Open the Products tab to see a list of the instruments you own. Then click on the product you want to download.
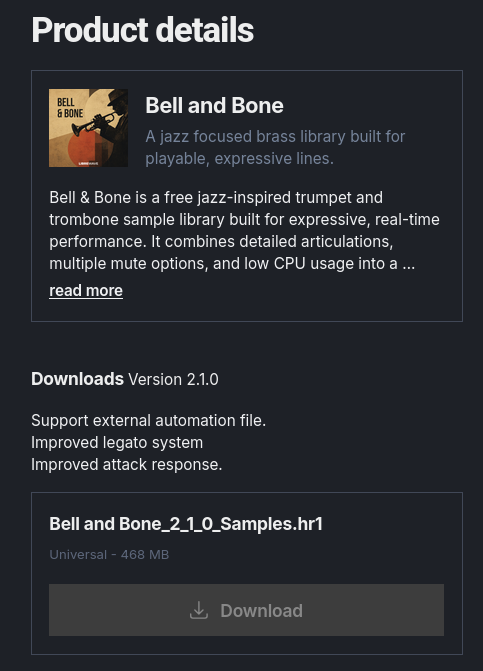
You’ll be taken to the Product Details tab which will show a brief description of the library and a list of files available for download.
Rhapsody installation packages are supplied as one or more .hr files.
Smaller packages are often a single .hr1 file. Larger packages may be split across several files, such as .hr1, .hr2, .hr3, and so on.
Make sure to download all of the package files for the library you’re installing and place them all in the same folder.
Installing a Package
Follow these steps to install a .hr1 sample library package in Rhapsody.
- Launch Rhapsody, either the standalone app or as a plugin – I recommend using the standalone here.
- Click the plus (+) button at the bottom of the Rhapsody window to open the instrument installer.
- Click the folder icon and select the .hr1 package file.
- Click OK to confirm your selection.
- On the next screen, click the folder icon to select a location to store the instrument’s samples. If you’re updating an existing instrument then you won’t see this screen. Rhapsody automatically creates a subfolder named after the instrument at the selected location.
- Click Install and wait for the samples to be unpacked.
- Once installation is complete, Rhapsody asks whether you want to delete the .hr package files. These files aren’t needed to use the instrument, so you can safely delete them if you don’t need to keep them for a later reinstallation.
- Restart Rhapsody and it’s ready to use.
Tip
During sample installation you can opt for either 16-bit or 24-bit files:
16-bit samples use less disk space and are suitable for most instruments.
24-bit samples use more disk space and are better for plucked strings, percussion, or when you plan to apply processing and effects.
Articulations
A full range of hammered dulcimer articulations is included, from long and damped notes to harmonics, triple strikes, tremolos and ebows.
Most articulations were recorded across three dynamic layers for expressive control.
All articulations include two recorded repetitions, combined with a scripted repetition engine that helps keep repeated notes varied and natural.
Hammers
Most articulations were recorded using both wooden and felt-covered mallets, allowing you to vary the character of the sound.
Articulations that aren’t labelled Wood or Felt in the articulation list were recorded using wooden mallets only. The exceptions are the Jim Bow and Ebow articulations.
Measured Articulations
Tremolo and Jim Bow articulations labelled Measured were recorded to a fixed tempo of 140 BPM. Time-stretching is used to adapt them to the tempo of your DAW.
In the standalone version of Rhapsody the tempo is set from Settings Panel > Engine > BPM.
Important
Time-stretching is CPU-intensive, so you may see CPU spikes when using these articulations.
This is particularly noticeable when playing complex chords, using long envelope release times, or playing many notes in quick succession.
The amount of CPU usage will also depend on the capabilities of your computer.
Sustain
This is the default articulation. The hammer striking the string and the note ringing out. You can control the decay using the envelope shape.
Damped
Similar to the sustain but less resonant, providing a rounder sound that tails off a little more quickly.
Strike & Mute
For these Nuno hit the string then a moment later palm muted it. The result is a short, staccato articulation with a definitive stop.
Triple Strike
Three notes played as a quick triplet. Great for use as an ornament or to add texture.
Harmonics
A bell like sound with a short release time.
Tremolo
Tremolo consists of repeated strikes on the same note, creating a continuous, sustained sound. The samples are looped, allowing the tremolo to be sustained for as long as required.
The three dynamic layers can be crossfaded in real time using the Tremolo DXF knob, allowing you to control the playing intensity.
Two versions are available: Unmeasured, which plays freely without being locked to the project tempo, and Measured, which uses tempo-based time-stretching to synchronise the tremolo rate to your DAW’s tempo.
Jim Bows
A Jim Bow is a small bowing device used to produce a sustained, bowed sound from the dulcimer’s strings.
Unlike conventional dulcimer playing, where the strings are struck with hammers, the Jim Bow draws a bow across the strings, producing a continuous tone with a distinctive sustained and textured character.
Nuno Silva’s Hammered Dulcimer includes three Jim Bow articulations:
Jim Bows Short
A single, short bow stroke.
Jim Bows Long
A single, longer bow stroke, allowing the bowed sound to develop and sustain.
Jim Bows Measures
Repeated back-and-forth bow strokes recorded as a loop. The loop is tempo-locked and uses time-stretching to synchronise the bowing rate with your DAW’s tempo.
Ebow
An Ebow is an electromagnetic device that sustains a string by continuously exciting it, producing a long, sustained tone without repeated striking.
The library includes two Ebow articulations:
Strike & Ebow
The string is struck initially, then sustained with the Ebow. This produces a slow, evolving sound with a relatively quiet sustain.
Ebow
A sustained Ebow drone with no initial strike.
Interface
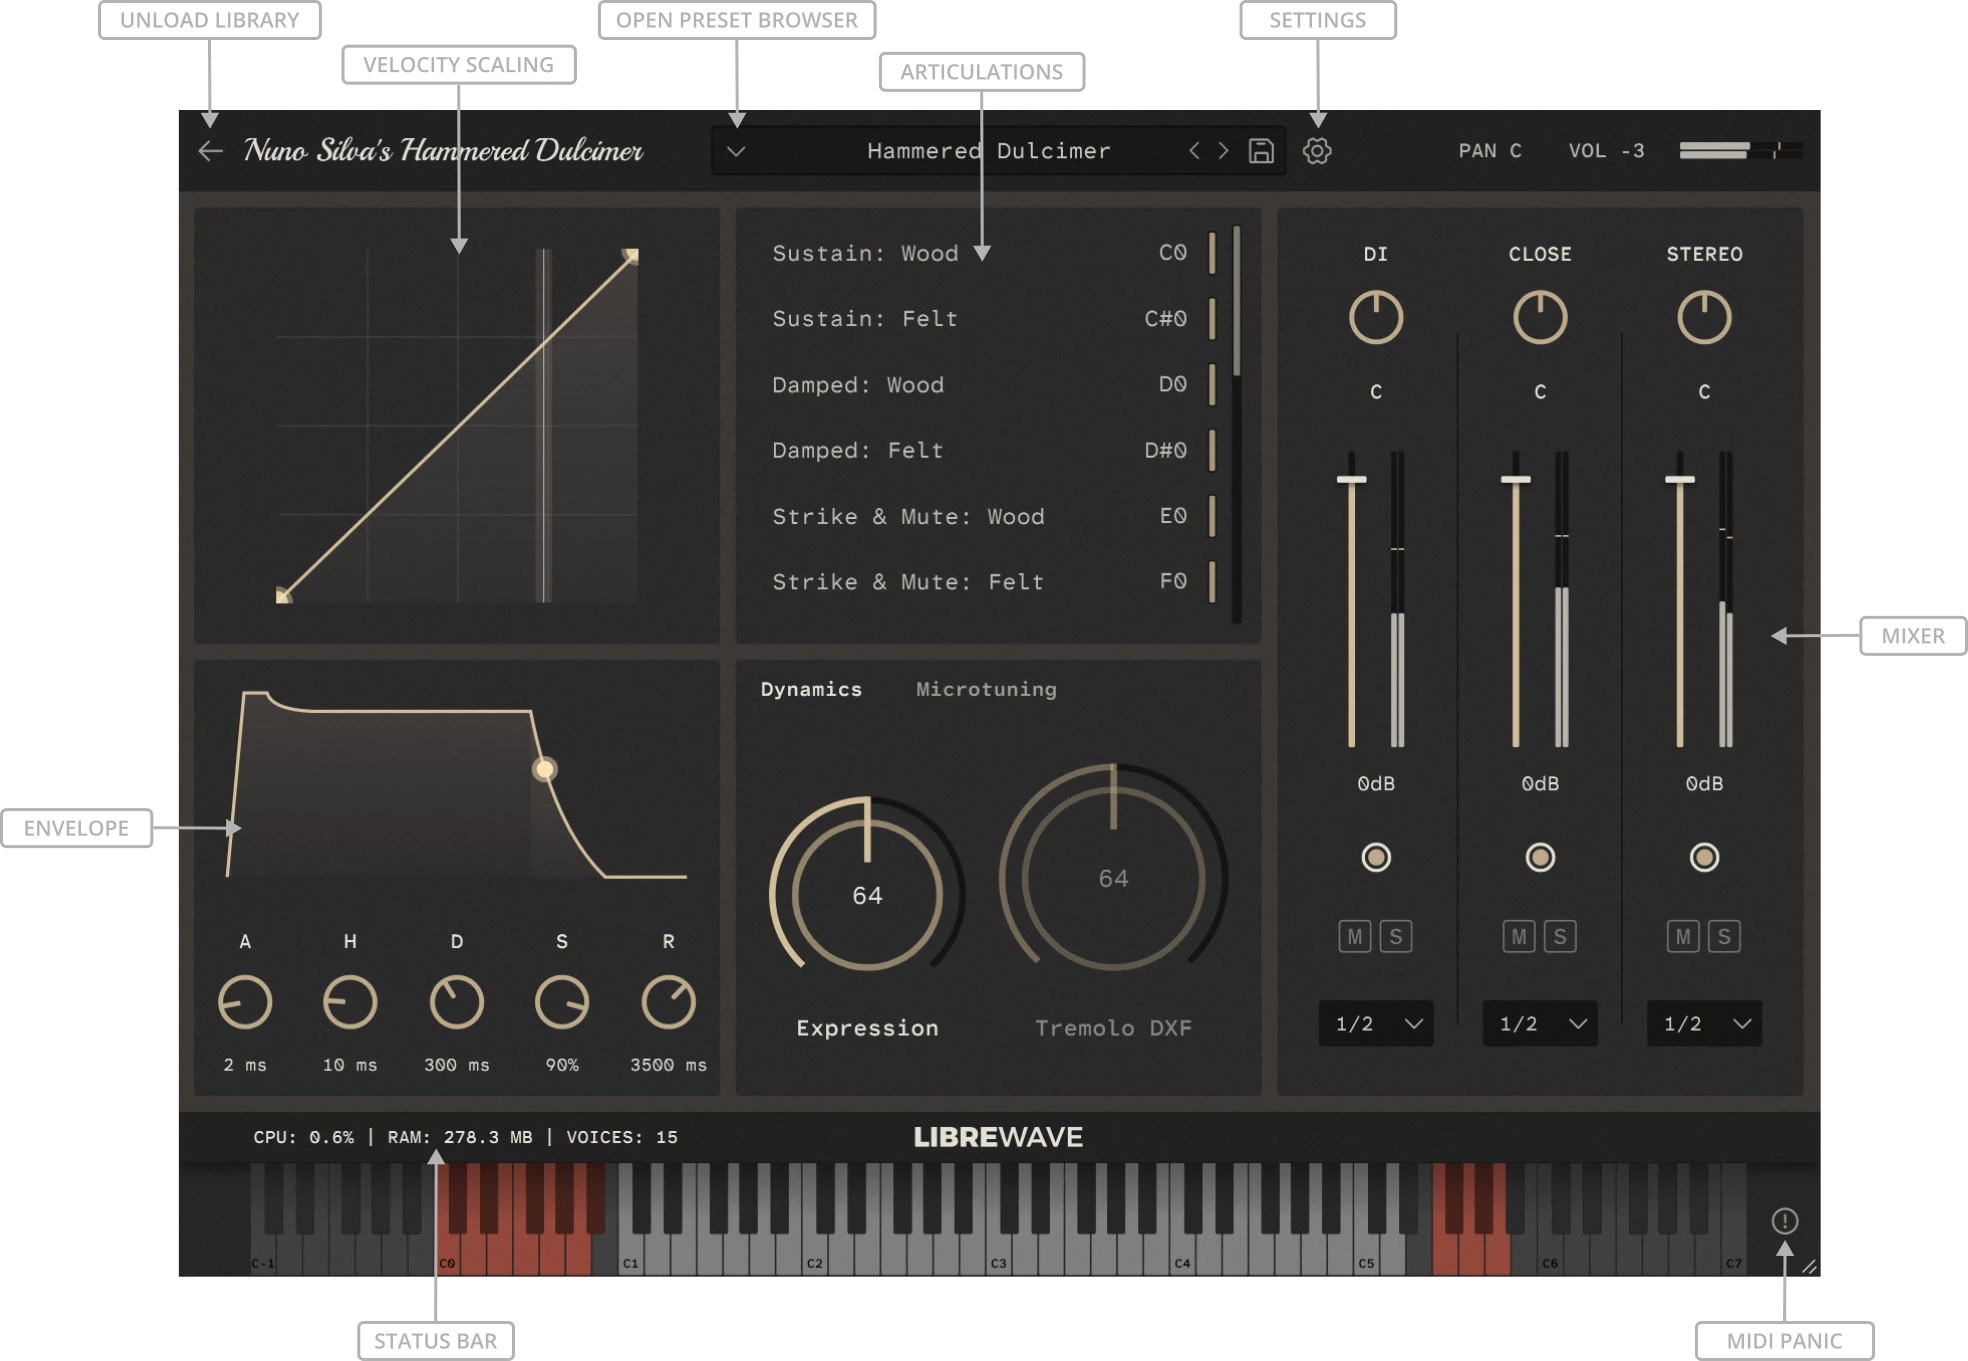
Basic Layout
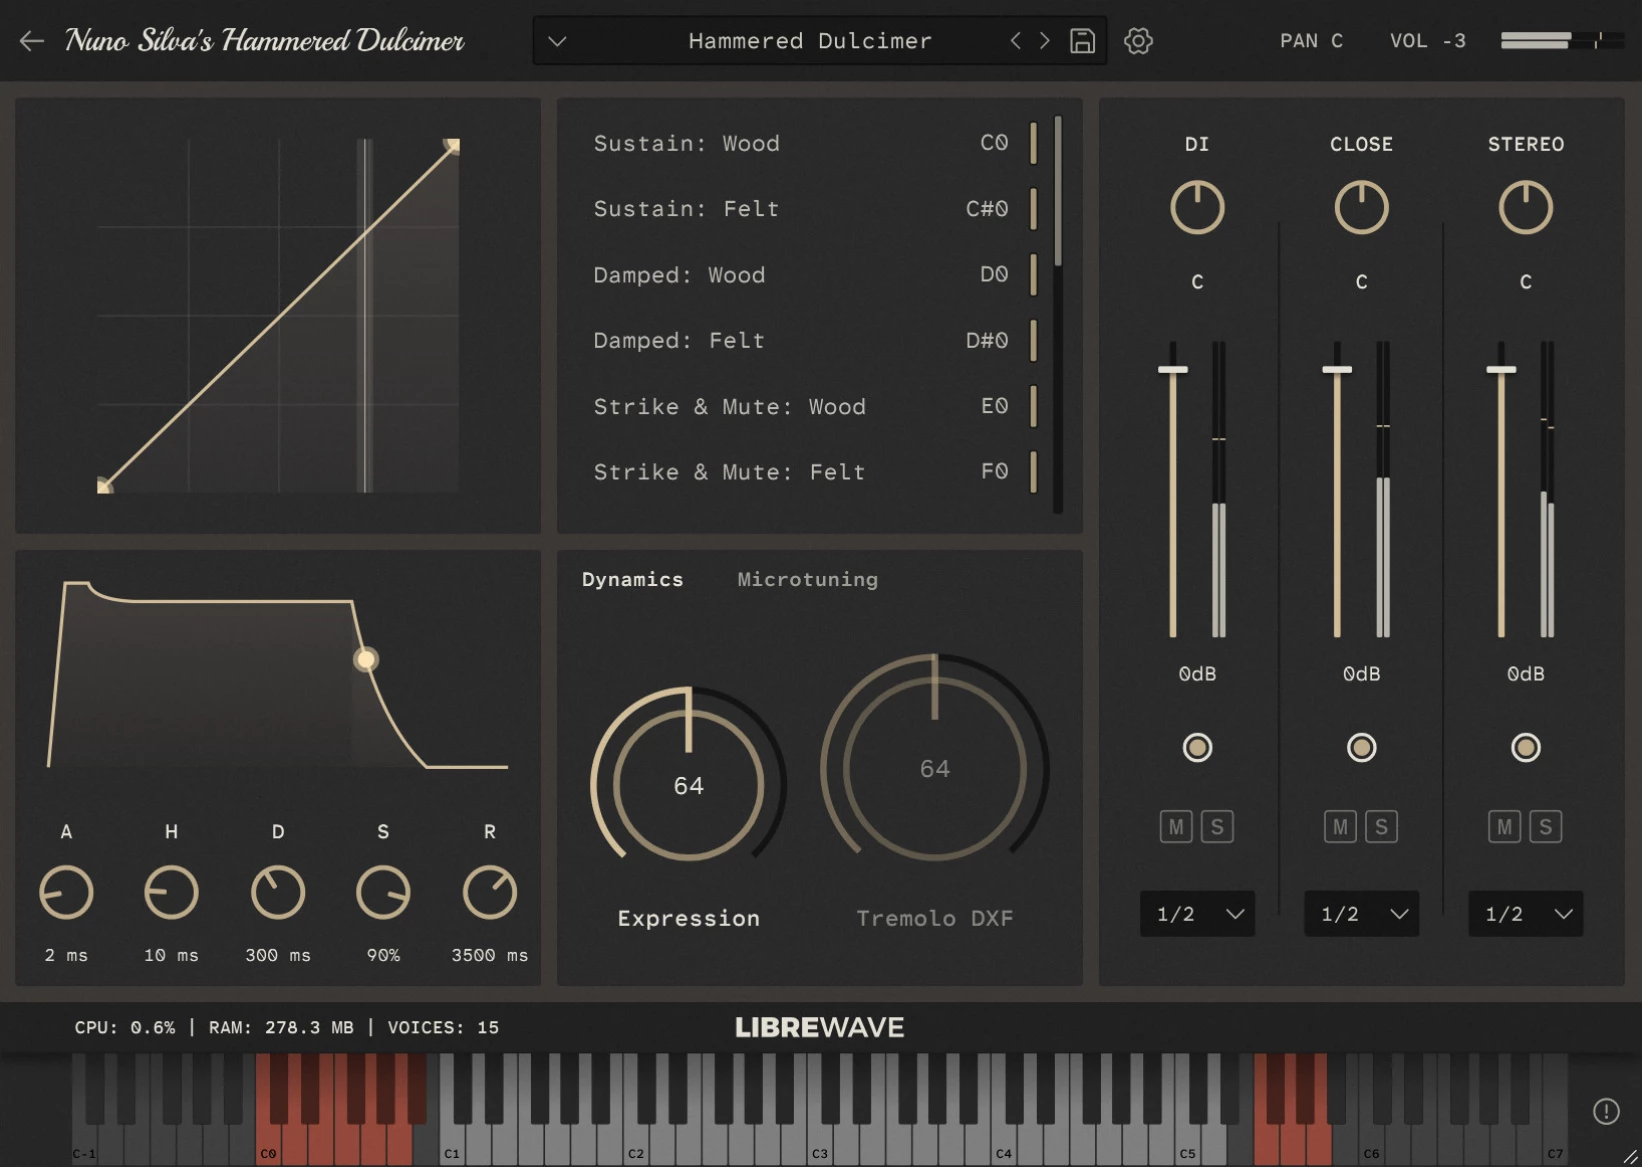
The interface is divided into three main sections: the header bar at the top, the main body in the centre, and the status bar and keyboard at the bottom.
The are also additional windows for the Settings Panel and Preset Browser. See the Rhapsody user guide for more information about these.
Using Specific Values
Holding SHIFT and left-clicking a control displays a text box where you can enter a specific value. Press ENTER to confirm the value.
Fine Control
You may find that some knobs and sliders move in increments that are larger than you’d like. For finer control, hold down CTRL while adjusting them.
Default Values
All knobs and sliders can be reset to their default value by double-clicking.
MIDI Learn
Most knobs and sliders can be controlled using MIDI Continuous Controllers (CC), either from a hardware MIDI controller or from MIDI data sent by your DAW or plugin host.
Many controls have specific CC numbers assigned to them by default. You can change these assignments by right-clicking a control and selecting a CC number from the Assign MIDI CC popup.
Alternatively, select MIDI Learn and then move a control on your hardware MIDI controller.
MIDI CC assignments can also be removed from the same popup.
Important
Don’t assign CC94 because it is used internally by Rhapsody and reassigning it might cause unexpected behaviour.
Macros
Rhapsody includes a macro system with 32 predefined macro slots. These work in a similar way to MIDI CC controls and can be assigned from the same right-click popup menu.
Once a macro is assigned it can be controlled using the automation lanes provided by your DAW. A single macro can be assigned to multiple controls.
Note
The Automation tab in the Settings Panel provides an overview of all MIDI and Macro assignments.
AHDSR Envelope
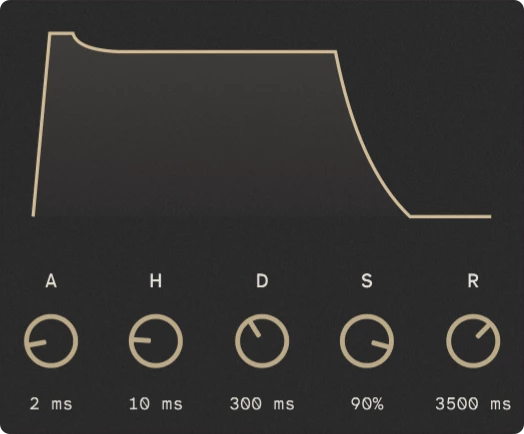
The gain envelope lets you control the instrument’s Attack, Decay, Hold, Sustain, and Release using the knobs below the envelope graph.
These parameters can also be edited directly on the graph, along with the attack level, attack curve, decay curve, and release curve.
Hover over different areas of the graph to see the available edit points.
Each articulation has its own envelope profile. These settings are saved with your DAW session and custom presets.
Tip
Hold ALT and left-click the envelope graph or controls to reset the envelope.
Articulation List
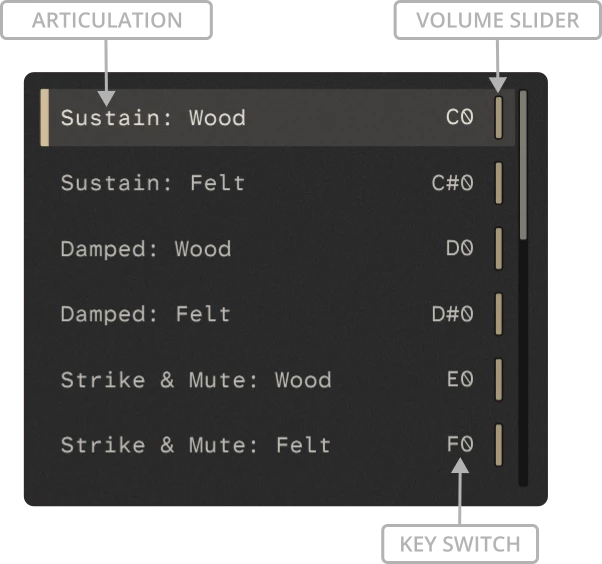
The Articulations list displays all available articulations and their associated keyswitches.
Each row shows the articulation name, the keyswitch used to select it, and a volume indicator.
Clicking an articulation in the list selects it. You can also select articulations by playing their assigned keyswitch from your MIDI keyboard.
The volume slider for each articulation ranges from 0 dB to -24 dB. It allows you to adjust the relative level of each articulation, helping you balance the articulations with each other.
Dynamics
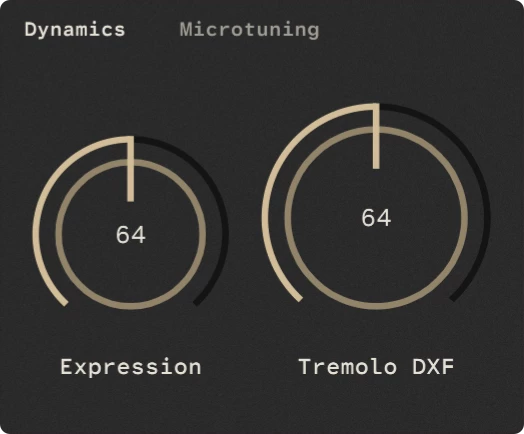
Expression
The expression knob is a sub-volume control, applied before the master volume. It provides an overall volume change to the instrument.
Dynamics or DXF
For sustained articulations with multiple dynamic layers, the Dynamics control is activated.
Also labelled DXF (Dynamic Crossfade) on some instruments, this control allows you to smoothly crossfade between the dynamic layers in real time.
An automatic volume curve is also applied to maintain a consistent and natural response across the instrument’s range.
Header

Library Name
Displays the name of the currently loaded library.
Unload Library
Rhapsody loads one library at a time. Click the back arrow in the top-left corner of the interface to unload the current library.
If you want to use several libraries together, you can load multiple instances of Rhapsody in your DAW.
Tip
Some older or third-party libraries may place the back arrow in a different location or use a different icon.
Current Preset
Displays the name of the currently loaded preset. Click the preset name or the arrow to open the Preset Browser.
Next / Previous Preset
The arrow buttons load the next or previous preset.
Save Preset
Saves the current settings as a preset. Factory presets are read-only and can’t be overwritten. If you’ve loaded a factory preset, you’ll be prompted to create a new custom preset when you save your changes.
If you’ve loaded a custom preset, saving will overwrite that preset with the current settings. You’ll be asked to confirm before the preset is overwritten.
Settings
Opens the Settings Panel.
Master Pan
Controls the overall stereo position of the library.
Master Volume
Controls the overall output level of the library.
Output Meter
Displays the current output level of the library.
Keyboard

Playable Range
The white keys show the playable range for the current articulation.
Keyswitches
The red key switches are used to change the active articulation.
Velocity
When playing the on-screen keyboard with your mouse, the position you click on the key determines the note’s velocity. Clicking higher up the key produces a lower velocity.
MIDI Panic
The Panic button at the right of the keyboard can be used if a note becomes stuck and won’t turn off. Clicking it immediately stops all currently sounding notes.
Microtuning
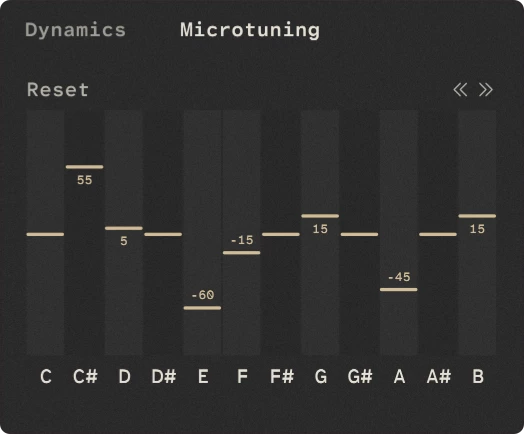
The Microtuning grid lets you adjust the tuning of each of the 12 notes in the chromatic scale independently. This is useful for creating alternative tunings or making small adjustments to the instrument’s standard tuning.
The microtuning works in conjunction with Rhapsody’s standard Coarse and Fine tuning controls found in the settings panel.
Each note can be adjusted in cents, with positive values raising the pitch and negative values lowering it. A value of 0 leaves the note at its standard tuning.
The controls affect all instances of the corresponding note across the instrument. For example, adjusting C# will affect every C# note, regardless of its octave.
It uses a fixed 12-note layout rather than a full scala style microtuning system.
The values you set are saved with your DAW session and custom presets.
The << and >> buttons shift the entire microtuning map down or up by one semitone. This allows you to transpose the tuning offsets while preserving the relative tuning between the notes.
Tip
Click Reset or Hold ALT and left-click the grid to reset all semitones.
Mixer
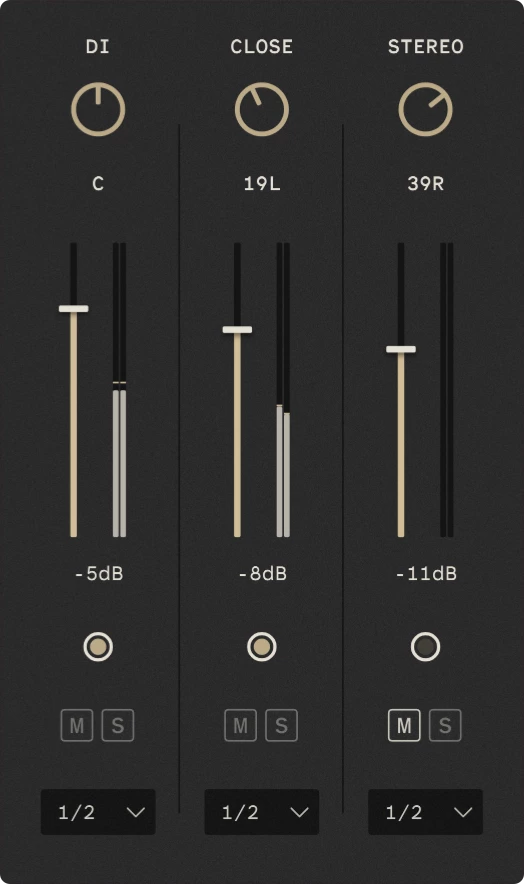
The mixer provides independent level and stereo positioning controls for the individual microphone channels.
This lets you balance the different microphone perspectives and for your desired mix.
Mixer settings are saved with your DAW session and custom presets.
Pan
The pan control adjusts the position of the channel within the stereo field. C represents centre, while L and R indicate left and right positions.
Volume
The fader controls the channel’s output level. The value displayed below the fader shows the current fader setting in dB.
Purge
The purge button unloads the channel’s samples from RAM. This can be used to reduce memory usage when a microphone channel isn’t needed.
Mute and Solo
The M button mutes the channel. The S button solos it, muting the other channels.
Multiple channels can be muted or soloed at the same time.
Tip
Holding CTRL while left-clicking a mute or solo button will unmute/unsolo the other channels.
Output
The selector determines which stereo output pair the channel is routed to. This allows each microphone channel to be processed separately in your DAW.
The output routing is available in the plugin version of Rhapsody. To use it you must enable multiple outputs for Rhapsody in your DAW.
Status Bar

The status bar displays three indicators showing the current state of the instrument.
CPU
Shows the amount of CPU being used by Rhapsody.
RAM
Reword this, I added the bit about lazy loading
Shows the amount of system memory currently being used by the instrument’s samples. If this value is 0 MB, no samples are currently loaded, this is the case when lazy load is enabled and no notes have been played.
Tip
If you hear no sound from the instrument and the RAM value is 0 MB, this indicates that Rhapsody isn’t loading its samples. In this case, redirect Rhapsody to the correct samples folder.
Voices
Shows the number of voices currently being played. This increases as you play additional notes and decreases when notes are released.
Velocity Curve
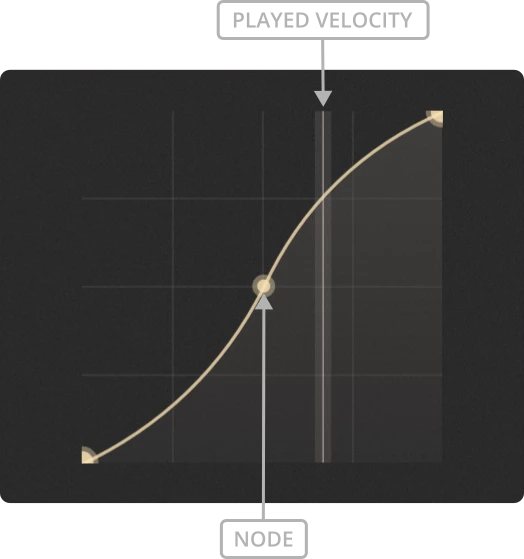
The velocity response table allows you to scale the MIDI velocity values recieved by the instrument.
This lets you adjust the velocity sensitivity of articulations.
A steeper curve increases the response to changes in input velocity, while a flatter curve reduces it.
The X axis represents the incoming MIDI velocity. The Y axis represents the velocity sent to the instrument.
The vertical line shows the current input velocity.
Tip
Hold ALT and left-click the graph to reset it.
Adding nodes
Nodes can be added to the table by left-clicking.
Moving Nodes
Nodes can be dragged around by holding left-click on a node and moving the mouse.
Deleting Nodes
You can delete a node you’ve added either by right-clicking on it or by holding ctrl/cmd and left-clicking on it.
Setting the Curve
There are two methods to adjust the curve between two nodes. Start by placing your mouse cursor between the nodes. Then either hold right-click and move the mouse up and down, or roll your mouse’s scroll-wheel up or down.
Preset Browser
Organisation
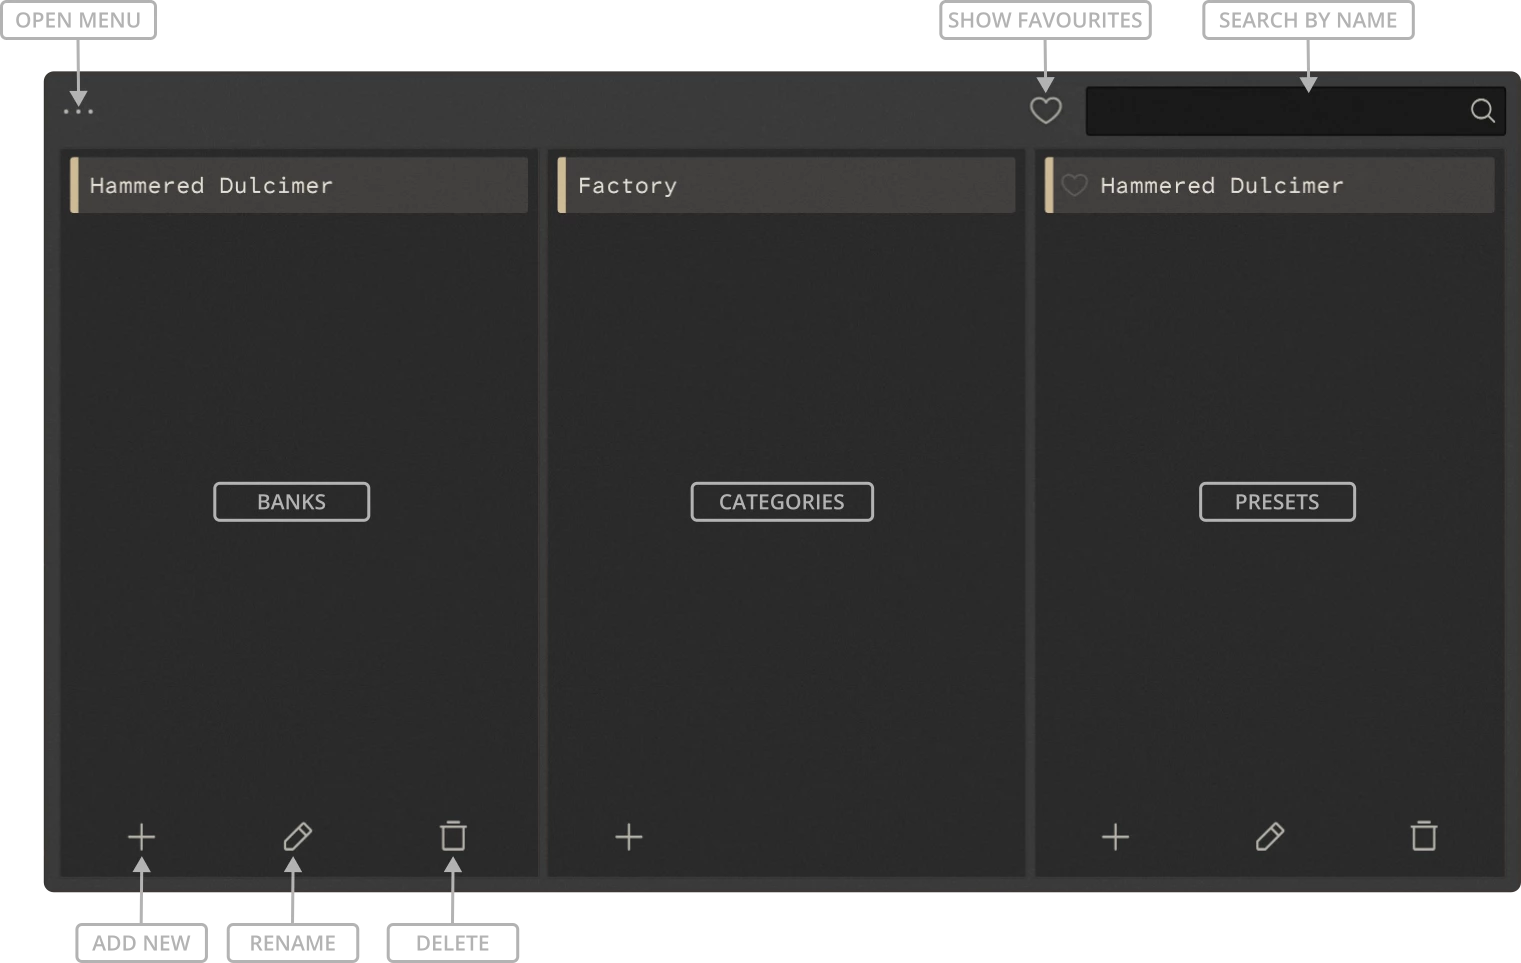
Presets are organised into three levels: Banks, Categories, and Presets. Select a bank and category to view the presets they contain. Click a preset to load it.
You can create your own banks, categories and presets using the + button at the bottom of each column. The pencil icon lets you rename the selected item, while the bin icon deletes it.
Search
The search field lets you search for presets by name.
Favourites
Click the heart icon to show only your favourite presets. You can mark individual presets as favourites using the heart icon next to their name.
Menu
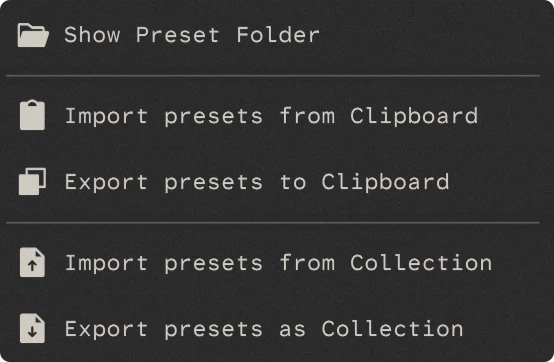
The three-dot menu in the top-left provides additional preset management options.
Show Preset Folder
Opens the folder containing your presets in the operating system’s file browser.
Import Presets from Clipboard
Imports preset data from the clipboard. If a category is selected, the presets are added to that category only. If no category is selected, all imported presets are added.
Export Presets to Clipboard
Copies presets to the clipboard so they can be pasted or shared elsewhere. If a category is selected, only its presets are exported. Otherwise, all presets are exported.
Import from Collection
Imports a .presetCollection file containing a collection of presets. The presets are added to the currently selected category, or to the general preset collection if no category is selected.
Export as Collection
Exports presets as a single .presetCollection file that can be saved or shared. If a category is selected, only its presets are included. Otherwise, all presets are exported.
Settings
Engine
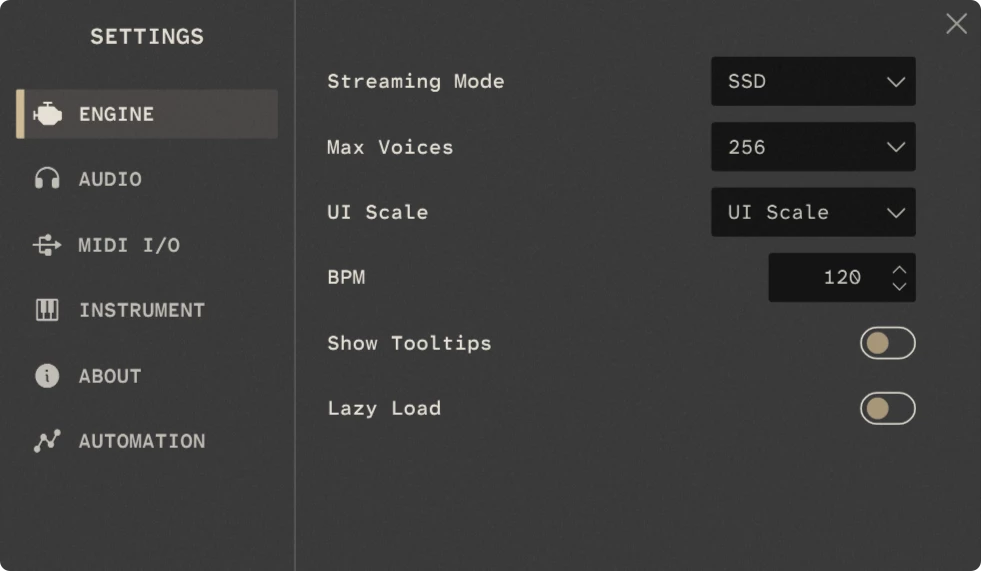
The Engine page contains settings that control how Rhapsody loads and plays samples, as well as a few general interface and playback options.
Streaming Mode
The setting automatically adjusts the internal preload and buffer sizes to suit the type of drive selected. This helps to optimise streaming performance.
Max Voices
Sets the maximum number of simultaneous voices Rhapsody can play. Lowering this value can reduce CPU and memory usage but may limit the number of notes that can play at the same time.
UI Scale
Controls the size of the Rhapsody interface. You can resize the interface manually by dragging the handle in the bottom-right corner. Alternatively, select a fixed size from the dropdown menu.
To return the interface to its default size, double-click the library name in the header.
BPM
Sets the tempo for libraries with tempo-locked features. This control is only available in the standalone version of Rhapsody. In the plugin version, the tempo is automatically read from your DAW.
Show Tooltips
Enables or disables the tooltips displayed when hovering over controls.
Lazy Load
When enabled, samples are loaded into RAM only when they are needed. This can reduce the initial memory usage of the library as unused samples aren’t loaded until they are played.
Audio
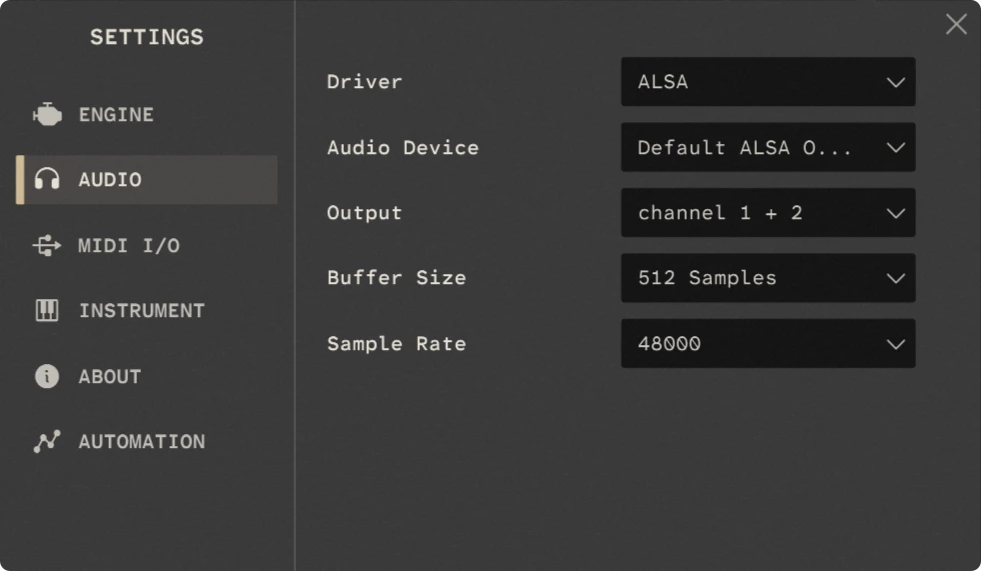
The Audio page contains the audio settings for the standalone version of Rhapsody. These controls are disabled in the plugin version, as audio configuration is handled by your DAW.
Driver
Selects the audio driver used by Rhapsody. The selected driver determines which audio devices are available.
Audio Device
Selects the audio device used by Rhapsody. The available devices depend on the selected driver. The selected device determines which output channels are available.
Output
Selects the output channels used by Rhapsody. The available outputs depend on the selected audio device.
Buffer Size
Sets the audio buffer size used by Rhapsody. Smaller buffer sizes reduce latency but can increase CPU usage, while larger buffer sizes increase latency but can improve performance.
Tip
For best results, use a buffer size that is a power of two, such as 128, 256, 512 or 1024 samples.
Sample Rate
Sets the audio sample rate used by Rhapsody. This should normally match the sample rate of your audio hardware.
MIDI I/O
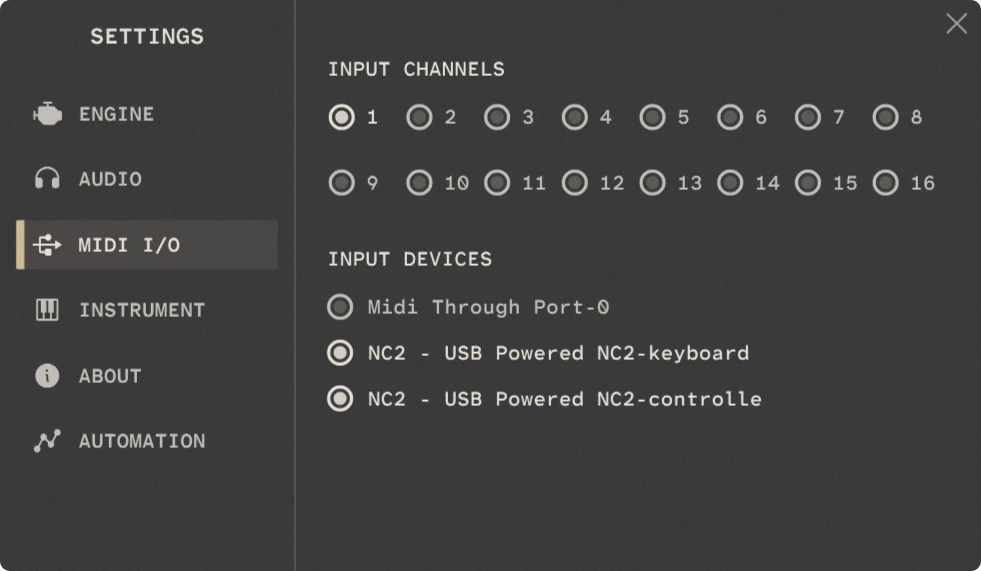
The MIDI I/O page lets you select which MIDI inputs Rhapsody receives MIDI data from.
Input Channels
Selects the MIDI channels that Rhapsody will respond to. Multiple channels can be enabled at the same time.
Double-clicking any channel toggles all channels on or off.
Input Devices
Selects which MIDI devices Rhapsody receives MIDI data from. Multiple devices can be enabled simultaneously.
This section is hidden in the plugin version because MIDI devices are managed by your DAW.
Instrument
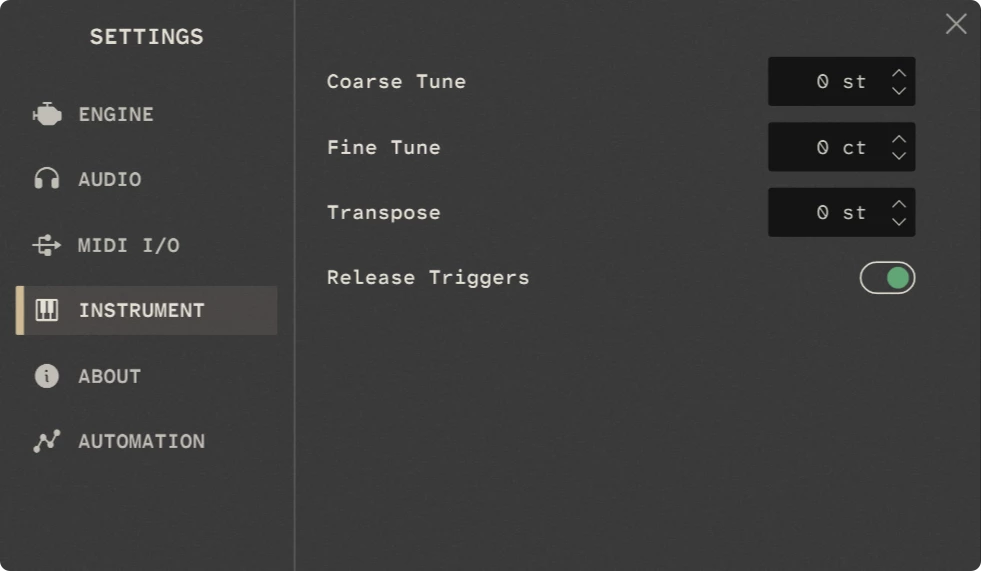
The Instrument page contains tuning controls and other settings specific to the current instrument.
Coarse Tune
Adjusts the tuning in semitone increments. The setting is applied when a note starts and doesn’t affect notes that are already playing.
Fine Tune
Adjusts the tuning in cent increments. The setting is applied when a note starts and doesn’t affect notes that are already playing.
Transpose
Transposes the instrument in semitone increments. The setting is applied when a note starts and doesn’t affect notes that are already playing.
The transposition is also reflected on the on-screen keyboard.
Release Triggers
Enables or disables release triggers for articulations that support them. When enabled, a release tail is played when a note is released.
Automation
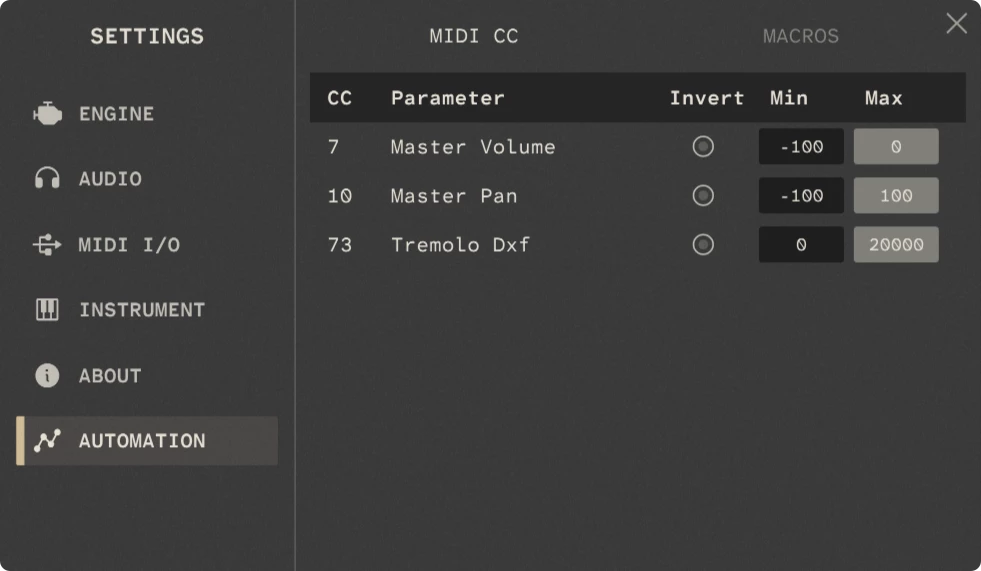
The Automation page provides an overview of the MIDI CC and Macro assignments for the current instrument.
Use the tabs at the top to switch the view between MIDI CC and Macros.
Each assignment shows the CC number or Macro assigned to a parameter, along with controls for modifying how it responds.
Invert
Reverses the direction of the assigned control. For example, a MIDI controller value that would normally increase a parameter will decrease it instead.
Min / Max
Sets the minimum and maximum values of the parameter that can be reached by the assigned CC or Macro. This lets you restrict the control to a specific range of values.
Note
Automation assignments are stored separately from presets in an external file. This means your assignments are preserved when you change presets or load another instance of the same library.
Credits
Produced by
David Healey
Performed & Recorded by
Nuno Silva
Editing & Scripting
David Healey
Proudly Built with HISE